Originally I had intended to just rebuild the stock motor and put it back in the bike but I now had this extra motor out of the Ultra-Lite with a big carb on it and just sitting there . About that time I lost my mind. "STOCK MOTOR !?! , WE DON' NEED NO STINKIN' STOCK MOTOR !!" . I mean, if you've ever ridden one of these bikes you know they put the slooo in slow. Don't get me wrong, these little beasties will rev like a chainsaw (which by the way they are) but by the time you go through all the gear reduction in the drive-train a perky turtle could run your ass over . So I says to myself "Self, they put these things in racing carts and go a hunnert miles an hour. If they can do it,so can you."
Like I said earlier, I lost my mind.
So I started looking for tips on just what the "Big Boys" did to make a PowerBee stand up and bark. I e-mailed people all over the country, I visited racing web sites, I hung out in chat rooms, I called people at home in the dead of night. Generally I made a big nuisance out of myself until somebody broke down and spilled the beans. The guy that finally came through was E.J. Korecky of E.J.s Creations . EJ builds a lot of the motors that the winning teams use in the US 820 Kart series, and he gave me "THE FORMULA".
The basic concept was pretty simple, raise the compression to astronomical proportions, decrease the volume of the crankcase, install electronic ignition and advance the timing till it tears your arm off and feed it with a carbureter that would do justice to a small block Chevy. Oh yeah, and put a dyno tuned $$$ exhaust pipe on it. It reminded my of an old racing adage ; "Speed Costs Money, How Fast Do You Want To Go ?" not to mention " The Faster You Go, The Faster You Blow".
I started coming to my senses about then.
O.K. I says, so what can I do to pump this puppy up without breaking the bank or my arm ?
"AND THIS IS WHAT THE WITCH DOCTOR SAID TO ME"
1) Use .030 head gasket
2) Use Boyesen 620 reeds
3) Use an HL 334 Tillotson carb
4) Press the output seal in until it touches the crank bearing
5) Use an Atom ignition module and set the timing around .068-.072 btdc
6) Use a SnoRunner compression release head
7) Use a 5K ohm NGK plug cap
8) Use a NGK B9HS plug gapped at .030
9) Deburr and slightly open all the ports
10) Run premium gas with synthetic racing oil at a 16:1 mix
11) And oh yeah, get a dyno tuned $$$ pipe
Dang ! There was that $$$ again ! So, being a man of frugal temporment,(read cheap), I set out to find an alternative exhaust (read cheap). I started by researching expansion chamber design and construction. One good site I found was The Tuned Exhaust System which gives a basic overview of how an expansion chamber works. A better one is Modifying Your Engine, it has enough math on it to fry most brains (at least it fried mine). Also,MacDizzy is an excellent site for two stroke speed mods.
After sifting through all the formulas and variables that $$$ pipe started looking better. Unfortunatly the ready made pipes on the market are little short fat buggers (kinda like me) that look cool on a go kart but not on a motorcycle. So I says to myself (again) "Self, since you only slightly modified the motor, perhaps you can slightly modify the stock pipe".
Well Kiddies, thats just what I did.
I took a stock expansion chamber style exhaust system from a mid 80s Rokon and cut the muffler section off leaving just the head pipe and expansion chamber. Then I shortened the head pipe 4 inches and added a 5 inch 1/2" i.d. stinger. Without a dyno to test this thing I will have to wait until the bike is rideable to test it properly. Designing the perfect pipe is one part math, one part experience and eight parts voodoo.
My next trick is to rebuild the transmission and front miter box. When I pulled the trans down for inspection I found a lot of rust damage to the bearings so I'm replacing all eight of them along with new seals. I'll also be replacing the over-ride spring with a new one along with new boots for the Apex joint. I think it's kind of neat that all the transmission bearings,miter box bearings and wheel bearings are the same size. The only oddball is the driveshaft support bearing (which I will also replace). Then I'll rebuild the brake calipers,install the new stainless steel brake rotors, new chains and 11 tooth sprockets. Next I'll get the tank and sheetmetal painted and install the new handlebars,clamps,levers and cables. I'm still working on an isolation system for the tank and a screw-on remote vented cap modification. I also still need to rebuild the torque convertor and design a belt guard and drive chain tensioners.
So, as you can see, I've got a lot of work left to do. I have managed to round up all the hardware (nuts,bolts,washers etc.) in stainless with the exception of the axle adjuster bolts. It looks like I'll have to custom make those.
Anyway, thats where I stand on the project to date.
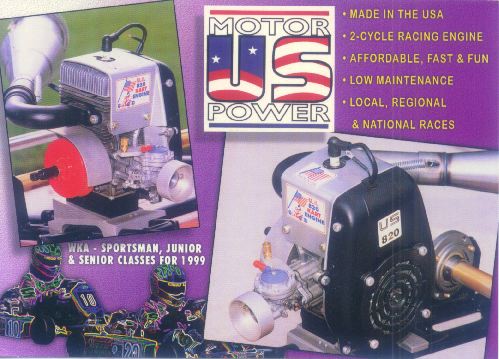 | Here's an ad for the US 820 racing motor that inspired me. You can see more at the U.S. Motors website. |
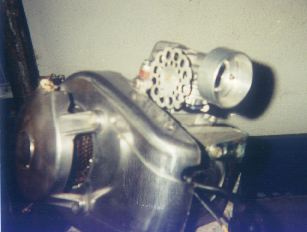
 | This is the motor I got to use as a guinia pig for this project. It is a Chrysler 82026 Power Bee. The old Chrysler versions of the 82xxx motors were built to tighter tolerances than the newer ones made by U.S. Motors. This particular motor came out of an ultra-lite plane. If you look closely you can see the rubber isolation mounts on the fan shroud. It came with an HL232B Tillotson carb which is quite a bit larger than the stock Rokon HL173A. It also had a cool custom made aluminum wheel fixed to the high speed adjusting needle. I replaced the 232B with a 334A racing carb. The 334 is about the same bore as the 232 but dosen't have a choke plate and the venturi is radiused and polished. |
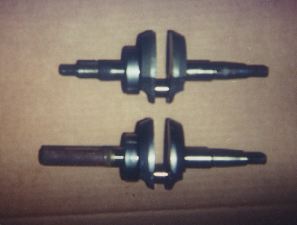 | The main difference between the 82026 motor and the stock 82007 motor is that the 026 turns counter clockwise and the 007 turns clockwise. Also the 026 (bottom) has a 3/4 inch dia. straight output shaft and the 007 (top) is stepped to fit the Rokon clutch. So I swapped a 007 crank into the 026 block. |
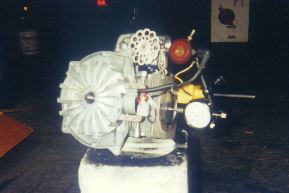
 | Here's a shot of the 026 block after I cleaned it up and polished the flywheel cover. |
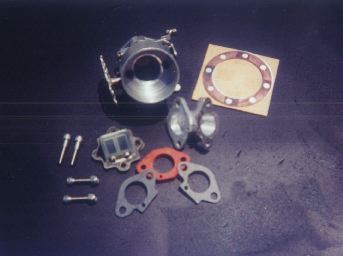 | Here's the 334A carb, Boyesen reeds, carb spacer, ported intake manifold, thin copper head gaskets and stainless steel mounting hardware. |
 | Another shot of the carb showing the high speed adjuster wheel and the velocity stack/air filter mount. I'll use a K&N air filter. |
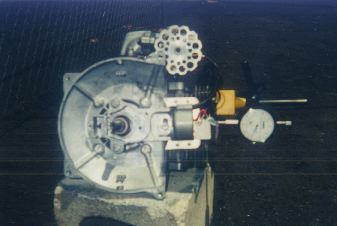 | Here's the dial indicator setup for setting the timing. You can just see the Atom module mounted on the coil. These are great little units that replace the points and condensor. Most small engine shops carry them for around $20 bucks. |
 | Another shot of the dial indicator, this time with the flywheel in place and a spark tester on the plug wire. I ended up using the 026 CCW flywheel on the 007 crank. It was in better condition and although it is marked CCW and the 007 wheel is marked CW, I could find no physical difference between them. (note: on closer inspection I found that the polarity of the flywheel magnets are reversed so I will be using the 007 flywheel) I did notice that the point cams were different between the two motors as well as the direction of rotation of the pull starter. Of course when I put in the Atom module it eliminated the points and cam. |
 | Here's a picture of a compression release head installed on a Rokon. I had the steal this pic from Mark Peterson because none of my pics came out. One of these days I gotta get me a real camera. Mark has a page on his excellent ROcKON-LINE web site that covers the CR head conversion very well. Basicly a compression release makes starting the bike much easier by relieving some of the compression pressure while you crank the motor. It is a must for a high compression, pull start motor like mine. |
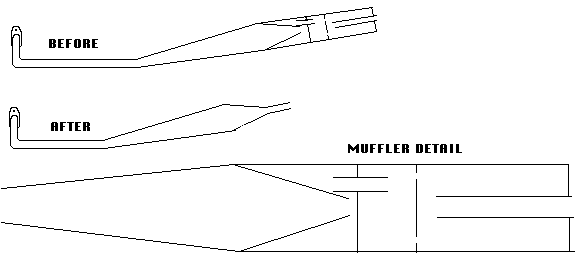 | My first stab at a custom pipe. It's basicly a stock pipe with the muffler section removed and replaced with a stinger. I also shortened the head pipe by 4 inches. The jury is still out on this design until I can get the bike finished and I can fine tune it with my seat of the pants dyno. |
 Click the poster to see my parts wanted list. |
 |
 Help support Manyringding Buy a KEEP ON ROKIN "T" SHIRT ! |
I can be contacted HERE